The Ultimate Guide to Adding Patches and Custom Logos to Tactical Shirts
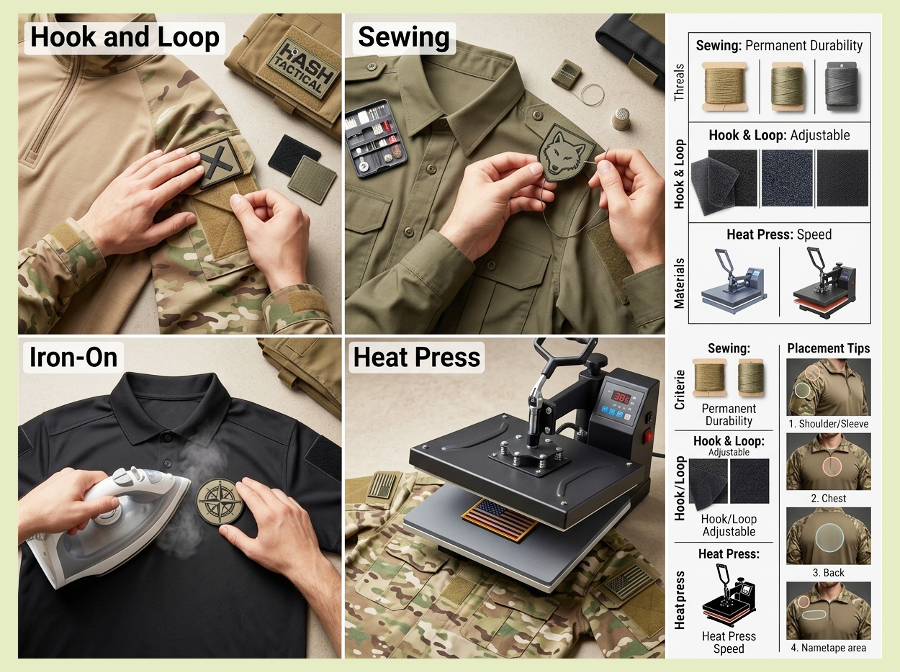
Use hook and loop (Velcro-style) patches if you swap patches often. Sew patches on if you want a permanent, rugged hold. Use a heat press for logos on moisture-wicking fabric, and skip basic iron-on patches on stretchy performance shirts.
Here is the quick version:
- Hook and loop is best for changing patches fast.
- Sewing is best for long-term wear and hard use.
- Heat press logos are best for flat, clean logos on polyester.
- Iron-on patches are best for light use only, and they often fail on tactical shirts.
The rest of this guide shows you how to do each method, step by step.
Quick Comparison: Which Patch Method Wins?
| Method | Hold Strength | Removable? | Skill Level | Best For |
|---|---|---|---|---|
| Hook and loop | Strong | Yes | Easy | Unit patches, name tapes, flags |
| Sew-on | Very strong | Hard | Medium | Badges, permanent emblems |
| Heat press | Strong | No | Medium | Flat logos on polyester |
| Iron-on | Weak to fair | No | Easy | Cotton shirts, light use |
| Sew-on loop panel | Strong | Yes (patch only) | Medium | Sleeves that need many patches |
Know Your Fabric First
Before you attach anything, check the shirt tag. The fabric decides which method is safe.
Common Tactical Shirt Fabrics
- Polyester or polyester blends. These are light and dry fast. They can melt under high heat.
- Nylon/cotton ripstop. This is tough and handles stitching well.
- Spandex blends. These stretch. Stitches can pucker, and glue can crack.
- Cotton. This takes heat well but holds sweat.
A moisture-wicking shirt is built to pull sweat away from your skin. Thick glue or heavy stitching can block that job in small spots. Keep patches small and in the right places.
Quick test: Try your method on a hidden spot first. The inside hem works well. If the fabric shines, curls, or shrinks, stop.
Method 1: How to Attach Velcro Patches to Tactical Shirts
Hook and loop is the most popular choice, and for good reason. You can swap patches in seconds.
The words “hook and loop” are the generic term. “Velcro” is a brand name. People use both.
How It Works
One side has tiny hooks. The other side has soft loops. Press them together and they grip.
- The hook side (rough) usually goes on the patch back.
- The loop side (soft) usually goes on the shirt.
Why? Hooks can snag and scratch fabric. Keeping them on the patch saves your shirt and your skin.
Step-by-Step
- Pick your spot. Lay the shirt flat. Mark the place with a fabric pencil or chalk.
- Cut the loop panel. Make it about 1/8 inch bigger than the patch on every side.
- Round the corners. Square corners peel up. Round ones stay down.
- Pin the loop panel. Use pins or clips. Keep the fabric flat.
- Sew it down. Use bonded nylon or polyester thread. Stitch around the edge, then sew an “X” through the middle for big panels.
- Press the patch on. Push the hook side onto the loop panel. Pull gently to test it.
Tips That Save You Trouble
- Use sew-on hook and loop, not stick-on. Adhesive backing gets gummy in heat and with sweat.
- Wash the shirt with the hook side closed against loop. Open hooks grab other clothes.
- Use a small piece of fabric tape to hold the panel while you sew.
Example: A paintball player wants to switch team patches each weekend. A sewn loop panel on each sleeve lets them swap in under ten seconds.
Method 2: Sew-On Tactical Badges
Sewing is the oldest method, and it still wins for strength. A well-sewn patch can outlast the shirt.
What You Need
- Sew-on patch
- Bonded nylon or heavy polyester thread
- Needle (a sharp, strong one) or a sewing machine
- Pins or fabric clips
- Thimble (optional, but your finger will thank you)
Hand-Sewing Steps
- Pin the patch in place. Check that it sits straight.
- Thread the needle. Knot the end.
- Start from inside. Push the needle up through the shirt, right at the patch edge.
- Stitch around the border. Use small, even stitches. Space them about 1/8 inch apart.
- Go through the shirt only. Do not stitch through to the back of a seam or pocket.
- Knot it off on the inside. Add a tiny dab of clear fray sealant if you like.
Machine-Sewing Steps
- Use a heavy-duty or denim needle.
- Pick a straight stitch or a narrow zigzag.
- Sew slowly. Pivot at corners with the needle down.
- Backstitch at the start and end.
Stretchy Fabric Warning
On shirts with spandex, use a ballpoint needle and a slight zigzag stitch. A straight stitch can snap when the fabric stretches. Add a thin piece of stabilizer inside for a flat result.
Method 3: Iron-On Patch Application (And Its Limits)
Iron-on patches have a heat-activated glue on the back. They are quick, but they come with real risks on tactical shirts.
Why Iron-On Often Fails on Tactical Shirts
- Many tactical shirts use polyester, which can melt or scorch under a hot iron.
- Moisture-wicking fabric has a slick finish. Glue may not bond well.
- Sweat, washing, and stretch break down the glue over time.
If You Still Want to Try
- Check the care tag for the max iron temperature.
- Set the iron to a low or medium setting. Turn the steam off.
- Place a thin cloth between the iron and patch.
- Press down hard for 20 to 30 seconds. Do not slide the iron.
- Flip the shirt inside out. Press the back for another 15 to 20 seconds.
- Let it cool fully before touching it.
Best Practice
Treat iron-on as a starter step, not the final one. Add a few stitches around the edge. This “iron and sew” combo holds much longer.
Method 4: Heat Press Logos on Moisture-Wicking Fabric
A heat press gives a smooth, thin logo. It works well for team names, company marks, and flat chest logos.
Common Types of Heat-Applied Logos
- Heat transfer vinyl (HTV). A thin sheet cut into a shape.
- Printed transfers. Full-color logos on a film.
- Sublimation. Ink turns into gas and bonds with polyester. It works best on light-colored polyester. It is done before the shirt is sewn in many factories, so it is not a simple add-on at home.
Basic Steps for HTV
- Wash and dry the shirt first. Skip fabric softener.
- Pre-press the spot for 3 to 5 seconds. This removes moisture and wrinkles.
- Place the logo with the carrier sheet facing up.
- Cover with a protective sheet. Parchment or a Teflon sheet works.
- Press at the film maker’s suggested settings. For polyester, this is often lower than for cotton. Check the product sheet.
- Peel as directed (hot peel or cold peel).
Dye Migration: A Hidden Problem
Dark polyester can leak dye into light vinyl when heated. This turns a white logo pinkish or gray. To lower the risk:
- Choose vinyl made for polyester, often labeled “low-bleed” or “anti-migration.”
- Use lower heat and shorter time.
- Test on a scrap or the hem first.
Combat Shirt Sleeve Patch Placement
Where you place a patch matters as much as how you attach it. Rules change by group, so check your unit or department policy first.
General Placement Guide
| Patch Type | Common Spot | Notes |
|---|---|---|
| Unit or department patch | Upper left sleeve | Often near the shoulder seam |
| Flag patch | Upper right sleeve | Many groups face the flag forward |
| Name tape | Right or left chest | Matches your dress code |
| Rank or role tab | Chest center or collar area | Follows group rules |
| Team logo (airsoft/paintball) | Chest or sleeve | No strict rule, choose what looks clean |
Placement Tips
- Keep patches centered on the sleeve, not twisted.
- Leave a gap of about 1/2 inch below the shoulder seam so the patch does not rub the seam.
- Keep patches off the elbow. Bending breaks the bond.
- If your shirt has sleeve pockets with loop panels, use them. They are made for patches.
- Use a ruler, or fold the sleeve in half, to line things up.
Example: A police officer sews a loop panel on the left sleeve for the department patch. A sewn flag goes on the right. The name tape uses hook and loop on the chest.
Choosing the Right Patch Type
Patches come in different builds. The build affects weight, look, and price.
- Embroidered. Thread on a fabric base. Classic and tough.
- PVC (rubber). Raised, waterproof, and easy to clean.
- Woven. Fine detail, flat finish.
- Printed. Good for photos and shading.
- Leather or faux leather. Rugged look, needs strong thread.
For hard use, PVC and embroidered patches hold up best. They shrug off mud, rain, and rough handling.
Common Mistakes to Avoid
- Using glue-only patches on sweaty shirts.
- Skipping a test spot. One scorch mark can ruin a good shirt.
- Using weak thread. Regular all-purpose thread breaks fast under strain.
- Cutting the loop panel too small. The patch edges flip up.
- Sewing too tight. Fabric puckers and the shirt looks wavy.
- Washing wrong. Hot water and a hot dryer age patches and glue.
How to Care for Patched Shirts
- Close all hook and loop before washing.
- Turn the shirt inside out.
- Wash in cool water on a gentle cycle.
- Air dry if you can. Heat harms glue and vinyl.
- Do not iron directly on patches. Press from the inside.
- Brush lint out of hook patches with a stiff brush or a comb.
Should You DIY or Buy Pre-Customized?
DIY is fun and cheap for one or two shirts. It gets slow and risky for a whole team or a full department.
Pre-customized shirts give you:
- Even stitching
- Correct loop panel size and spot
- Logos pressed at the right heat
- Matching results across many shirts
If you want a ready option, Hash Tactical offers a range of customized tactical shirts so you can skip the guesswork. This helps most with team orders, uniforms, and branded gear.
When you plan a bulk order, ask about:
- Minimum order size
- Logo file types they accept (vector files are best)
- Sample or proof before production
- Turnaround time
Teams that order from Hash Tactical can also pair shirts with matching patches, which keeps the whole kit looking the same.
How to Add Patches to Tactical Shirts
4 Methods Compared
Check Your Fabric First
Hook and Loop in 6 Steps
Where Patches Go
| Patch | Common Spot |
|---|---|
| Unit or department | Upper left sleeve |
| Flag | Upper right sleeve |
| Name tape | Chest |
| Team logo | Chest or sleeve |
Quick Do’s and Don’ts
Tools and Supplies Checklist
- Sew-on hook and loop strips
- Bonded nylon thread
- Sharp scissors
- Fabric pencil or chalk
- Pins or clips
- Ballpoint needle (for stretch fabric)
- Teflon or parchment sheet
- Ruler
- Heat press or iron (if needed)
Frequently Asked Questions
Sew on a loop panel, then use hook-backed patches. You get a strong hold and can swap patches when you want.
Yes, but with care. Use low heat, no steam, and a cloth barrier. Test first. A heat press with exact settings is safer.
Not by much. Thread holes are tiny. Keep patches small and avoid covering large areas, such as the whole back.
Velcro is a brand. Hook and loop is the general term. Both work the same way.
Sweat, stretch, and washing break the glue. Slick fabric also holds glue poorly. Add stitching around the edge.
Use bonded nylon or heavy polyester thread. It is strong and resists rot, sun, and wear.
Most groups place it on the upper left sleeve. Rules vary, so check your own guidelines.
Yes. Use a ballpoint needle, a mild zigzag stitch, and a thin stabilizer. Avoid stiff, heavy patches in high-stretch zones.
Close the hooks against loop panels before washing. You can also wash patched shirts in a mesh bag.
With good thread and care, it can last as long as the shirt does.
Final Takeaway
Pick your method based on your needs:
- Swap often? Use hook and loop.
- Want it permanent? Sew it.
- Need a clean logo on polyester? Use a heat press with the right film.
- Light use only? Iron-on can work, with a few stitches added.
Test first, use strong thread, and follow your group’s placement rules. Take your time, and your shirt will look sharp for years.
👉 Want customized tactical shirts with patches, contact our expert design team today!